How To Set Temperature On A GE Refrigerator
A warm refrigerator is a nuisance for every homeowner because it melts all your frozen desserts and spoils your fresh food, groceries, and other eatables.

It can become a costly affair if not dealt with right away, and you’ll have to shell out hundreds of dollars for repair. More often than not, adjusting the temperature settings can quickly fix your malfunctioning appliance.
Keeping in mind that not everyone is well-versed with it, we’ve curated a guide on “how to set temperature on a GE refrigerator?” So today, we’ll walk you through the basics of adjusting temperature controls so that you can go about it without issues.
How To Set Temperature On A GE Refrigerator?
Whether you own a side-by-side or a french-door refrigerator, the good news is that almost all GE refrigerators are similar in operations. However, even then, we suggest you refer to the owner’s manual before adjusting the temperature setting on your appliance.
Even though its older models are equipped with analog temperature controls, they differ from one another. While some of them feature separate controls for the fridge and freezer, others have only one for both the compartments.
On the other hand, the recent models boast digital temperature controls, making it easier for homeowners to adjust the refrigerator temperature.
Setting Temperature On Models With Single-Control Analog
If you own an older model that features a single-control analog, setting temperature isn’t as challenging as it may sound. Usually, they come with temperature indications ranging from 0 (cold) to 9 (coldest).
Moreover, the temperature in these models is set manually at 5 degrees when released from the store, which is enough to keep your food fresh and beverages cold. So, if you want to adjust the temperature on the older models, you can do it by following these steps:
Step 1: Look For The Analog Control
To begin with, search for the analog control that will most probably be nesting behind the fresh food crisper on the dispenser panel. If it isn’t there, search for it above the crisper.
Step 2: Adjust The Temperature
Adjusting the temperature in single control models is easy and will take hardly five minutes. All you need to do is change the temperature on the control dial to your preferred range, and that’s it.
Temperature Adjustment On Old Models Featuring Double-Control Analog
Much like single control models, double-control analog models are equipped with temperatures ranging from E to 9°F. On top of that, they are also set at 5 degrees Fahrenheit in the showroom.
And making temperature adjustments in these models is similar to those featuring a single-control analog. Simply look for the control dial on the dispenser panel and set the temperature to any range you want, and that’s it.
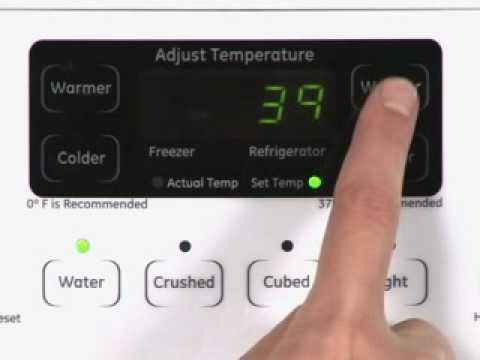
Setting Temperature On Refrigerators Equipped With Digital Temperature Controls
Undoubtedly, changing the temperature on modern refrigerators is slightly different from the older models. This is mainly because it is set at 37° F while the freezer is at 0° F.
So, if you have to set or adjust the temperature on a newer model, follow the steps mentioned below.
Step 1: Press The Keys On The Control Panel
The control panel features both ‘warmer’ and ‘colder’ keys, so you can press either of them to display the current temperature setting for both the freezer and the fridge. After that, the ‘Actual Temp’ light will display the set temperature of both the compartments.
Furthermore, the number that you see on the right side of the refrigerator is the temperature of the fridge, while the one on the left is that of the freezer.
Step 2: Press Them Again
After seeing the temperature on the panel, press either of the two keys again to display the “Set Temp” indicator. Now, you’ll be able to see the temperature setting on the display of the refrigerator.
However, you must keep in mind that the temperature settings on the fridge and the freezer may slightly differ from the ones displayed on the panel. Ideally, usage and operating conditions are responsible for such disparities.
Step 3: Set The Temperature
In case you want to set the temperature to a colder degree, you’ll have to press the colder key of the respective compartment. Keep holding it until the panel displays the temperature you wish to set your refrigerator at.
For instance, if the fridge temperature is at 5°F, but you want to set it at 1°F, keep pressing the button until you reach the number.
But, you must also note that you should change the settings once in 24 hours. So, if you accidentally set the fridge at a lower temperature and want to change it to a higher degree, wait for 24 hours before adjusting.
Frequently Asked Questions
What Is The Ideal Temperature For The GE Refrigerator?
Ideally, it is recommended to set your temperature at 37 degrees Fahrenheit for the fridge and 0 degrees Fahrenheit for the freezer compartment.
Do GE Refrigerators Have A Reset Button?
No, GE refrigerators aren’t equipped with a reset button, but you can reset the control panel by turning off the power for a brief moment.
How Long Does A New GE Refrigerator Take To Get Cold?
Averagely, it takes about 24 hours to reach an ideal temperature upon startup or temperature adjustments.
Summing It Up
Whether a refrigerator is too warm or too cold, it is pretty much a cause of inconvenience for homeowners. So, make sure you set the temperature immediately by following the steps mentioned above to avoid major issues.
However, if the refrigerator isn’t functioning properly even after adjusting the temperature, calling a maintenance specialist is the best bet. After all, meddling with an electronic appliance is dangerous and can damage it permanently.
Needless to say, hiring a professional for regular inspection is advisable as it will keep your appliance safe from frequent repairs and keep it in excellent condition. With that, we’ll call it a wrap for today; till we meet again!

![How To Add Apps To A Samsung Refrigerator [Quick Guide]](https://breezerfreezer.com/wp-content/uploads/2022/07/How-To-Add-Apps-To-A-Samsung-Refrigerator.png)