GE Refrigerator Autofill Overfilling (How to Fix)
Like all other appliances, refrigerators have been upgraded with time to enhance their convenience of use in response to the changing needs of users.
The introduction of the Autofill feature is one such innovation adopted by brands like GE that has made it super-easy to fill water from the fridge anytime. So, you no longer require adjusting the food level inside a GE refrigerator manually.
But you can’t totally rule out the malfunctioning of the Autofill feature like any other part of the fridge. An overfilling problem mostly affects this feature, thereby leading to a mess and risking a more significant fault in the model. And you wouldn’t, of course, want to call a technician immediately.
That’s why you’ll need to be conversant with some effective tricks to tackle this problem quickly. Read our guide to know all the essentials in this regard.
How to Fix A GE Refrigerator Autofill Overfilling
Before we move on to discuss the ways to fix the overfilling problem, here’s a brief look at how the autofill feature works in a GE refrigerator:
How Does The Autofill Feature Of A GE Refrigerator Work?
Using the Autofill feature in your GE refrigerator will trigger the unit to fill a container with the desired amount of water. What makes this possible is the functioning of the sensors near the freezer compartment and the fridge door.
Notably, these sensors detect the presence of the container and the increasing water level, helping to dispense filtered water till it’s 90% full. The sensors also are connected to the primary unit through some wires.
So, when the sensors detect the right temperature, they signal the unit to activate its compressor, which then runs till the internal temperature drops to the level desired.
How To Solve The Overfilling Issue?
Following are the best ways to solve the overfilling issue in the autofill mode of a GE refrigerator:
1. Check The Water Pressure At Your Home

You’ll have to make sure that the space where the refrigerator is kept has a water pressure anywhere between 60 and 100 PSI. The Autofill function will perform optimally in such a room, as per the recommendations of the manufacturer.
If you aren’t acquainted with the PSI standards, know that the above-mentioned range of water pressure is the same as 414 to 689 kPa. If your home’s water pressure doesn’t fall within this range, bottled water will be a better alternative. But make sure you don’t use tap water as it comes with many impurities that may ruin the baked goods.
2. Clean The Sensors
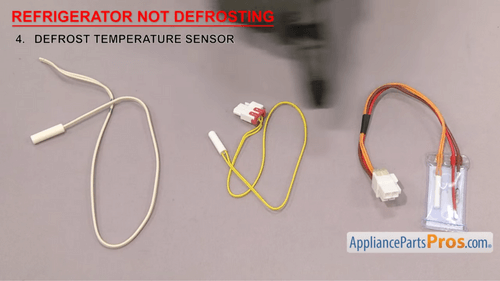
Checking the sensors on the fridge and the freezer compartment is a key requirement when it comes to retaining the efficiency of the Autofill function. These components help ascertain how hot or cold the fridge is at any point in time. Thus, if they aren’t working correctly, your fridge may turn too cold or too warm.
That’s why you’ll need to keep the sensors clean throughout — use a damp, clean cloth for this purpose, as a moist and dirty surface might reduce the efficiency of the sensor. But be careful not to spray liquid or cleaners directly on its surface.
Here’s the process to follow for cleaning the autofill sensor:
Step 1: Begin by running hot water into a unit and allowing it to sit for around 10 minutes. Then switch off the power supply to the fridge and detach its top panel.
Step 2: Next, you’ll have to clean the sensor with the help of a soft brush and some dish detergent. Ensure that you rinse it thoroughly after you’re done cleaning it.
Step 3: At this point, reattach the autofill sensor and replace the top panel.
Step 4: You’ll then have to turn on the power and test the fridge once.
3. Check The Decorations On The Containers
Homeowners often decorate the fridge containers with labels, stickers, or permanent markers. But ideally, it’s best to opt for plain containers that have smaller handles. That’s because the decorations on the top edge might alter the filling volume and lead to overfilling.
Still, if you prefer such decorations too, ensure that your choice doesn’t affect the measurements of the containers.
4. Use Ice Trays
Ice cubes generally melt fast, but in case you’re placing ice directly in the freezer, the process might take longer. That’s why you should use some ice trays for the purpose — fill the trays with around ½ cup of ice and transfer them to the freezer.
But make sure you’re using no more than this amount, as the excess ice used can sometimes affect the fill volume of the trays. Hence, if you’re already using a lot of ice, reduce the amount to avoid overfilling.
5. Use A Uniform Container Size
Using a different container each time is another major factor contributing to an overfilling problem in the Autofill mode. So, make sure to utilize containers of a particular size to get optimum results.
Containers that are 4-8 inches tall and 2-6 inches wide are the most suitable options as this is recommended by the manufacturer. Anything that’s wider or taller can cause variations in the fill level and functionality. Plus, some varieties may also come with a shorter recess, which will reduce the maximum container height.
You can estimate the ideal height by verifying whether the container is of the same height as the placement of the sensors at the bottom. On a side note, a height of 4 to 8 inches translates to 10 to 20 cm, while a width of 2 to 6 inches equals 5 to 15 cm.
6. Fix The Water Inlet Valve
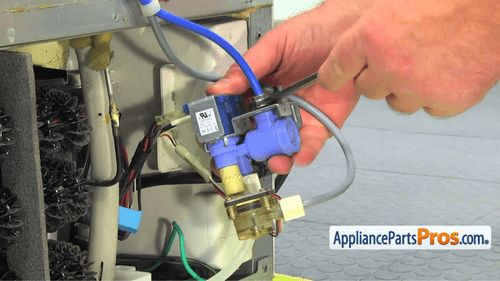
A leaking inlet valve might also cause the overfilling problem, which is why you’ll need to check it carefully. To locate the valve, turn off the supply of cold water to the refrigerator and detach the drain pan beneath the sink. You’ll now have to remove the washer to get the inlet pipe.
At this point, check if the pipe has clogs and clean it accordingly with the help of a soft brush. You should also replace the washer to ensure maximum efficiency. Finally, tighten the nut to complete the unclogging process.
7. Assess Quit Service Mode, Reset Boards, And Error Codes
Next, you can consider examining any error code or message appearing on the refrigerator screen or resetting the control boards. This will help clear all errors from the system and resume the normal functioning of all the components. And for this purpose, you’ll need the user manual of the fridge.
8. Get A Faulty Dispenser Board Replaced
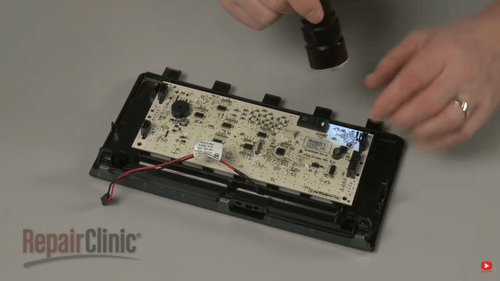
If none of the above methods could help rectify the problem, you’d need to replace the dispenser board that controls the functioning of the ice and water dispenser. But you’ll need a technician to detect and rectify such a problem, so don’t delay getting in touch with a reliable fridge repair service in this regard.
FAQs
How do you reset your GE refrigerator to restore its functioning?
Resetting all the functions in your GE fridge can help solve a range of issues. To rest the freezer, you’ll have to follow the steps given below:
Step 1: Turn off the power to the refrigerator, and remove the door panel.
Step 2: Next, unplug the unit and press and hold the “Reset” button till the reading on the display changes from “off” to “on.”
Step 3: Plug the fridge back in, and wait for around 30 seconds.
Step 4: Following this, close the fridge door panel and reattach the plug, wait for another 30 seconds, and then open the door again.
Step 5: Check if the icemaker is functioning at this point, and repeat these steps till you get the desired results.
How do you rest the bottom icemaker in a GE refrigerator?
Resetting the icemaker is simple — press the power button and hold it down till the light is turned off, and press and hold it again till the light illuminates. Note that this will help clear all errors from the refrigerator system.
What is the average warranty period for GE refrigerators?
GE refrigerators come with a limited warranty of one year on any part that doesn’t function properly owing to defects in their manufacturing or the quality of the materials used. The warranty might also include associated parts and a 30-day replacement guarantee along with coverage for those parts.
Final Words
At this point, you’re surely better equipped to handle the issue, so go ahead and get back the convenience of getting filtered water whenever you require it. Note that the above practices will also help maintain the overall efficiency of your refrigerator in the long term.
In case these tricks don’t work, you’ll need to look up reliable fridge repair services that can fix the issue.
Here’s the last tip before we end our guide — make sure to ascertain the amount of water needed in terms of the unit used by the particular model. Also, remember that the water dispensed will be measured in either liters or ounces.
See you next time!


![Brand New Fridge Making Noise? [17 Causes & Fixes!]](https://breezerfreezer.com/wp-content/uploads/2023/10/Brand-New-Fridge-Making-Noise.png)